Games Designer
Download the .tap file here - Games Designer - more of a level designer for a shoot-em-up but it deserves to be here.
Instruction Manual
PLAY GAME
SELECT NEW GAME
ALTER SPRITES
CONFIGURATION
MOVEMENT
ATTACK WAVES
LOAD FROM TAPE
SAVE TO TAPE
At any time, pressing [ENTER] will return you to the Main Menu, although it is sometimes necessary to press [ENTER] twice.
OPTION 1 - PLAY GAME
By pressing key 1 the 'current' example game included on the
program can be played. (There are eight examples included with
the program). If you wish to change the keyboard control keys
of the game to meet your own preference, hold down the
[CAPS SHIFT) whilst pressing key 1 to select this option.
Remember to do this if required when writing your own game .
The 'current' game can be changed by following the instructions
for Option 2 . The game can then be edited by following the
procedures outlined in Options 3,4.5 and 6.
The pre-programmed keyboard controls are on keys 6,7,8,9 and 0
depending on the game option selected.
To return to the Main Menu from playing a game, just press
[ENTER) .
OPTION 2 - SELECT NEW GAME
This option enables you to select any of the pre-programmed games, which will then become the 'current' game.
On pressing Option 2, you are then asked to choose between games 1-8 and the 'current' game is then changed accordingly .
The program will then return to the Main Menu, enabling you to
press Option 1 and the new 'current' game will then commence
running. Alternatively, you may select option 3,4,5 or 6 to
edit the new 'current' game.
The pre - programmed games under this Option are follows:-
1. ATTACK OF THE MUTANT HAMBURGERS
2. CYBORG
3. REFLECT RON
4. TURBO- SPIDER
5. TANKS A LOT
6. HALLOWEEN
7. SPLAT
8. QBIX
OPTION 3 - ALTER SPRITES
A 'sprite' is a collection of pixels which move across the
screen in unison and provide the moving or even animated
characters for the game, (aliens, ships or laser bases, figures,
explosions, bombs, missiles, etc).
The shape and colour of each sprite can be pre-defined thus
providing contrasts between types of sprite and different
attack waves.
When Option 3 is selected a display of pre-programmed sprites
will appear on the screen, any of which can be edited to meet
your own specifications.
The various classes of sprite are grouped as follows:-
| 00-15 | Aliens. |
| 16-23 | Ships or laser bases etc. |
| 24 | Missile for ship or laser base. |
| 25 | Missile or bomb for aliens. |
| 26 | Spare (can be used to shift or edit other sprites - see below). |
| 21 | Shield. |
| 28-31 | Explosion sequence. |
Under the Sprite Chart a message prompt appears - 'SELECT SPRITE'. Just press the two digit number of the sprite
you wish to edit.
No need to press [ENTER ] .
e.g. to change missile sprite press [24].
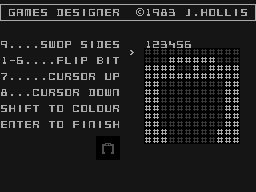
The screen display will now change to the SPRITE EDITOR.
On the top l eft of the screen are the keyboard controls.
On the bottom left is a display of the actual size and colour
of the sprite as it will appear on the screen whilst the game
is in progress.
On the right of the screen is the sprite dot editor.
All sprites are groups of 12 x 12 dots and are shaped by filling
in or erasing dots, using the keyboard controls as indicated on
the display. To fill a blank dot just select the co-ordinates
and to erase, select the co- ordinates of the dot to be erased.
Example 1 - To fill in 4 down, 6 across, press cursor down key [8] until cursor on fourth row down, then press (6).
Example 2 - To erase 2 down, 10 across, press cursor down key [8] until cursor on second row down, then press [9] to swap sides, then press [3].
N.B. When pressing [9] to swap sides, the number sequence at
the top of the SPRITE EDITOR screen will be reversed.
Please experiment until you become used to the SPRITE
EDITOR controls.
To change the colour of a sprite, hold down the [CAPS SHIFT]
key, then select a key from [0-7). The small display at the
bottom left of the screen will now change to display the
selected colour, which is now ready for use in the game . The
background colour may also be changed, as explained under the
notes for Option 4.
When you have finished editing the sprite and choosing its
colour, press [ENTER] to return you to the Sprite Chart.
You may now edit any other sprite by selecting lts number and
following the same procedure.
After editing, a sprite will always be returned to its original
number on the Sprite Chart.
For animation you may require 2 or 4 sprites which are
identical except for very slight changes. To save time you can
create the first in the sequence and then 'copy' it to other
number locations on the Sprite Chart, so that you can make the
necessary slight editing adjustments. To do this, when the
Sprite Chart is on screen, hold down [CAPS SHIFT] whilst typing
in the number of the sprite you wish to move. The message prompt will then change and appears as follows: -
'MOVE SPRITE nn TO'
Now release the (CAPS SHIFT) button and type in the number of
the selected new location .
Important Note
When redefining missile sprites, the trailing (i .e. bottom or
left) edge or the SPHITE EDITOR grid must be left blank to
avoid a trail being left by the missile if this is not
required.
To exit from ALTER SPRITES OPTION, press [ENTER) to return to
the Main Menu.
OPTION 4 - CONFIGURATION
When this option is selected, the following CONFIGURATION MENU
will appear:-
| 1 | .......... | GAME FORMAT = 2 |
| 2 | .......... | BACKGROUND = 0 |
| 3 | .......... | FOREGROUND = 6 |
| 4 | .......... | SPECIAL FX = 3 |
| 5 | .......... | MISSILE SOUND |
| 6 | .......... | BOMB SOUND |
| 7 | .......... | SHIP EXPLODE |
| 8 | .......... | ALIEN EXPLODE |
Pressing one of the keys [1 - 8] will enable you to change a
control setting. A flashing cursor shows which item you have
selected. A selection can be cancelled by simply pressing the
[ENTER) key .
CONFIGURATION CONTROLS
1 - GAME FORMAT
This control changes the movement direction of your ship or
laser base, the area of screen in which it can move, the types
of control keys to be used during the game and whether the
keyboard or a joystick is to be used.
The various GAME FORMAT options are as follows:-
0 - Invaders type.
1 - Asteroids type.
2 - Scramble type.
3 - Berserk type.
To use joystick, add the number 4 to any of the above values. e.g.
Invaders + Joystick = 0 + 4 = 4
Scramble + Joystick = 2 + 4 = 6
A message prompt appears when the GAME FORMAT option is
selected reading 'ENTER NEW VALUE (0-7)' Press the appropriate
key to select new GAME FORMAT.
2 - BACKGROUND
Press key [2] to change background colour.
A message prompt appears - 'ENTER NEW VALUE [0-7)'
When the new colour is selected, both the BORDER and PAPER
colours will be changed accordingly when the game is played.
3 - FOREGROUND
Press key (3) to change foreground colour.
Again, a message prompt appears - 'ENTER NEW VALUE [0-7)
When the new colour is selected, the score-line information and
stars will be changed to the selected colour when the game is
run.
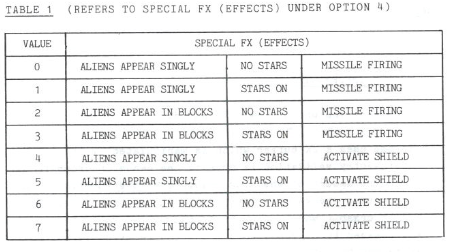
4 - SPECIAL FX (EFFECTS)
This option controls the following special effects: -
STARS - optional on- screen.
ALIEN INITIALISE - whether aliens appear singly or in groups.
SHIELD - whether shield is available to ship or laser base.
There are eight options (0-7) as listed in TABLE 1 at the end
of the manua1.
To return to CONFIGURATION MENU from any option 1-4, press (ENTER)
5,6,7 and 8 - SOUND EFFECTS
Press a key from [5-8] to change one of the sound effects.
5 = Missile Sound
6 = Bomb Sound
7 = Ship Explode
8 = Alien Explode
When one of the above keys is selected, the SOUND EDITOR CHART
will appear on screen. Each sound has 5 controls each being
represented by a graphic slider knob. Each knob can be moved
up and down using the numerical keys (0-9). The controls are
as follows:-
FREQ - sets overall frequency or pitch (1 = up, 2 = down)
RAMP 1 - sets speed at which pitch increases (higher pitch / 3 = up, 4 = down)
RAMP 2 - sets speed at which pitch decreases (lower pitch / 5 = up, 6 = down)
LEVEL - sets amount of pitch change caused by RAMPS 1 & 2 (7 = up, 8 = down)
TIME - sets length of sound (9 = up, 0 = down)
RAMP 1, RAMP 2 and LEVEL are off when knobs are set at the
bottom of their sliders.
Press [SYMBOL SHIFT] to trigger the sound. You will probably
find that you need to experiment in order to obtain the sound
you require.
Press [ENTER] to return from Sound Effects to the Main Menu.
OPTION 5 - MOVEMENT
On the left of the screen are displayed the eight programmable
movement patterns [0-7].
At the top right is the DIRECTION NUMBER CHART.
At the bottom right is the PATTERN INDICATOR.
Each movement pattern is made up of the following:-
| 1. | NO | pattern number |
| 2. | PATTERN | a numerical list plotting the movement direction(s) |
| 3. | NEXT | links one pattern to another e.g. PATTERN 1 can be linked to PATTERN 5 by entering [5] as the 'NEXT' value for PATTERN 1 |
To edit a Movement Pattern choose which PATTERN is to be edited
[0- 7]. e.g. to edit PATTERN 0 type [O] and a flashing cursor
will appear at the start of that PATTERN, which will also
be plotted on the PATTERN DISPLAY at the bottom right of the
screen .
A message prompt will then appear 'ENTER PATTERN <8 9>'
By pressing a direction key [0- 7] as per the DIRECTION NUMBER
CHART you may then change the direction. The cursor will then
move on to the next position.
To edit 'NEXT' function, move cursor to the 'NEXT' column.
You can repeat the same movement pattern by setting 'NEXT' to
the same number as the appropriate PATTERN number.
e.g. to repeat PATTERN O, set its 'NEXT' value at 0.
To build up a more complex movement, link PATTERNs together
e.g. set PATTERN 0 at 1 NEXT 1 value 4 etc.
KEYBOARD CONTROLS - Press [8] to move cursor LEFT
Press [9] to move cursor RIGHT
Press [ENTER] to finish editing
OPTION 6 - ATTACK WAVES
When Option 6 is selected the ATTACK WAVES CHART appears on
screen.
It contains eight programmable attack waves numbered from 0-7
down the left hand side of the screen.
The remaining columns, reading from left to right are operated
as follows:-
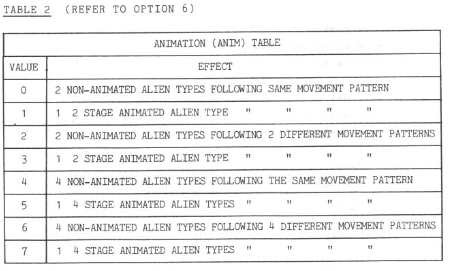
| ANIM | - | controls the animation and movement of aliens.
Animation is achieved by alternating between slightly
differing sprites (see TABLE 2 at end of this
instruction manual). |
| SCORE | - | controls the number of points awarded for each alien
destroyed. |
| PAT | - | controls movement patter n number at which the aliens
start their movement (see notes under Option 5). |
| MAX | - | controls maximum number of aliens in each attack wave. |
| SPD | - | controls speed of aliens, also whether or not they will
drop bombs (see TABLE 3 at end of this instruction
manual). |
| NEXT | - | controls which attack wave will follow present attack
wave. |
A game always starts at attack wave 0.
KEYBOARD CONTROLS
Hold down [CAPS SHIFT] and press one of the arrowed cursor keys
[5,6,7 or 8] to move the cursor. It will jump in the indicated
direction to the next number.
TABLES
The following tables at the end of this manual may be referred to when altering attack waves.
TABLE 2 - ANIMATION (ANIM)
TABLE 3 - SPEED (SPD)
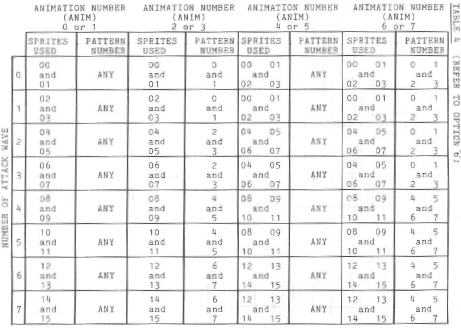
TABLE 4 - ATTACK WAVE, ANIMATION AND SPRITE CONTROLLER
OPTION 7 - LOAD FROM TAPE
With this Option you can LOAD a game which you have previously
SAVEd.
N.B. It is always necessary to LOAD the Games Designer program
first before your own game can be LOADed.
OPTION 8 - SAVE TO TAPE
Select this option to save a game you have written which can
later be LOADed by using Option 7.
APPENDIX
TECHNICAL INFORMATION
For those of you who may be interested:
Each game uses a 2K buffer which is manipulated by the menus.
All data - entry validation is done in the menus in order to cut
down on the amount of checking required by the run-time module.
Thus run-time checks are restricted to those which could cause
a system crash. When a game is to be run the data is
pre-processed to a convenient form and the relevant parts
transferred to buffers in the run-time module.
A dual task system is implemented at run-time, the graphics and
sound being interrupt driven, whilst break-ins and star
movement are a background task.
The program was developed on a standard 48K Spectrum with one
micro- drive and a slightly modified version of the excellent
Pic turesque Assembler/Editor.
The only ROM calls are for tape I/01 error handling for these
being re-directed. All other screen, keyboard and sound I /0 is
handled directly .
Four of the games supplied with the program were designed by
people with no programming expertise.
Table 1
Refers to special FX under option 4.
N.B.
2 Stage Aliens are made from 2 sprites
4 stage Aliens are made from 4 sprites
See table 4 for restrictions of which sprites and movement patterns amy be used.
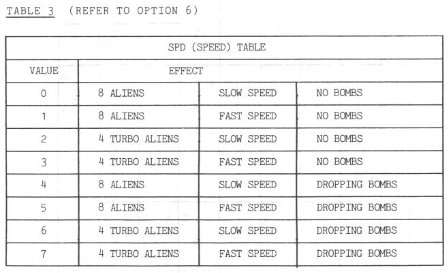
Table 4
--- ends.
|