Arcade Game Designer
Download - AGD4.7 - Zip file containing docs and TAP file to be used with ZX Spectrum emulator.
Main Menu
A. Character Set
B. Blocks
C. Screen Layouts
E. Events
F. Sounds
G. Save Game
I. Miscellaneous
J. Jump Table
K. Keys
L. Load Game
M. Map
N. Sprite Positions
O. Objects
P. Palette
S. Sprite Images
T. Text
W. Window Area
X. Test Game
Instructions for version 4.6 (including v4.7 updates)
Like PGD and SEUD, Arcade Game Designer is a tool for writing your own simple arcade games. While it is a little more complex than those 2 utilities and won't help you create scrolling shoot-em-ups, it should be capable of producing a wide variety of arcade affairs with the minimum of fuss, so long as you are patient and prepared to stick at it. What's more, Games produced using the utility are stand-alone and can be freely distributed.
AGD has already been put to good use by various authors, and is responsible for many games. Some examples are Apulija-13, Hedgehogs, Kyd Cadet, Land of Mire Mare and Trooper: point 5. All these are thoroughly recommended and can be found in the World of Spectrum archives if you really want to see what earlier versions of AGD can do.
That isn't all, however. AGD now comes with explosions, magic dust/vapour trails, bigger sprites, lasers, scrolling text messages and a facility to colour sprites giving the game designer the ability to create games which are more professional-looking than ever before. It is easily capable of producing games to the covertape or budget software standards of days gone by.
Now for the bad news. AGD has its own built-in language, a rather simplistic affair with simple functions and a few built-in variables which you'll have to pick up if you wish to add your own little touches, game logic or otherwise deviate from the built-in templates. In truth the lexicon is not huge, it's mostly a question of understanding how to use each particular command or function. It is mostly very straightforward. While the program will tell you if it finds a word it doesn't understand, syntax checking is non-existent. However, AGD 4 will move the cursor straight to the line in question, so you at least know where the problem is.
Because I wanted to produce a games designer for everyone to use, the program is free to download from my website. Copyright, however, remains with the author. Donations are not necessary, so if you really must show your appreciation go out and buy a copy of SEUD or PGD from www.cronosoft.co.uk or something. Failing that, plans are afoot to release a tape version AGD on the Cronosoft label in the near future.
While AGD 4 is the most robust version released to date, the program comes as you find it, with no guarantees that it is entirely bug-free. Please do not expect email support - I will be happy to answer questions and hear requests for enhancements and bug fixes on the AGD forums instead. I get around to updates from time to time, other projects and life generally permitting. Until then save your work as often as possible, and preferably as a snapshot if you are using an emulator.
Most importantly of all, have fun. In the meantime, I'm off to Ripley to get hideously drunk.
Jonathan Cauldwell, 4th April 2008.
http://www.spanglefish.com/egghead
Constructing a game
AGD requires a little swapping of tapes for saving and loading, so if you are using an emulator it is a good idea to switch off the option to automatically load tape files as soon as they are inserted. Failure to do so could result in the loss of any work you have done on a game should you attempt to change the tape.
In SPIN, click Tools, then select Options from the menu. Select Files from the list on the left, then click on the Tapes tab at the top. Make sure there is no tick in the box next to Load Tapes Automatically. You are now ready to start developing with AGD.
Basically, games are a combination of different elements:
- character blocks are combined together to form screens
- sprites (including the player) are positioned in their starting positions on each screen, and assigned a type characteristic
- logic is then written for each type of sprite - player, enemies, objects etc.
After that, it's a question of adding anything else you want.
Main Menu
Enables you to select a function of the game you wish to design. The amount of memory remaining available to your application is displayed in the top right corner of the this screen.
Window area
You can vary the play area's size and position in the Window/scrolling option. The cursor keys allow you to position the window anywhere on screen.
Changing the window size and/or scrolling direction can alter the amount of data required for each column or row of blocks in each screen, and thus invalidate the present levels. If this is the case, the program will ask if you wish to destroy the map data before allowing you to proceed. It is a good idea to select the size of the play area first, and stick with it.
1 = narrow window
2 = widen window
Q = shorten window
A = lengthen window
Palette
Since version 3, AGD has supported ULAplus-enabled Spectrums and emulators by default. If you are using SPIN version 0.7s you can turn on the ULAplus emulation by selecting Options from the Tools menu (or just pressing F8) and then selecting the Display option on the left. If you then select the Emulation tab at the top, there should be a tick box for 64 Colour enhanced ULA. Make sure this is selected, then click the Okay button at the bottom.
The ULA+ palette editor allows you to move around the 64 colours of the 4 colour look-up tables (CLUTs), modifying them. The RGB value of the selected colour is shown in the bottom right corner of the screen.
R = change red component of colour
G = change green component of colour
B = change green component of colour
ENTER = Return to main menu
Keys
This allows you to define the keys your game will use. 7 Keys are permitted and the Kempston joystick is mapped onto the first five of these. The equivalent Kempston action is shown on screen when you you are prompted for each key. AGD defaults to keyboard, but if you are technically minded, you may wish to use Kempston joystick within your game via POKE 32005,1 or Sinclair joystick with POKE 32005,2. For keyboard, POKE 32005 with any other value.
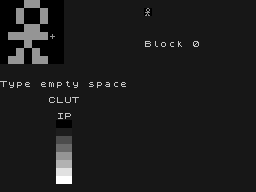
Character Block Design
Blocks are used to construct the screens. Each block is 8 x 8 pixels in size, and has a different type assigned to it. There are a number of different types, each with its own different set of attributes. These are:
EMPTY SPACE - player moves freely through free space blocks.
NORMAL PLATFORM - player moves freely past platforms from left, right or below.
SOLID WALL - a block which is impassable from any direction.
LADDER - player moves freely through ladder blocks in any direction.
FODDER - as solid wall, can be removed with certain functions.
DEADLY - sprites move through this, DEADLY function tests for contact
CUSTOM - sprites move through this, CUSTOM function tests for contact
Move cursor around the character with the cursor keys. Use SPACE or 0 to set/unset a pixel. ENTER returns to the main menu. You can set the colours with P, I and B. As bright and flash bits can be set or unset, so if you intend your game to run on ULAplus-modded Spectrums or emulators all 4 CLUTs are available.
Q = Move left through list of block properties
W = Move right through list of block properties
L = Last block
N = Next block
P = Paper colour
I = Ink colour
B = Change brightness and flash bits
M = Copy current block to clipboard
K = Paste block from clipboard
C = Clear current block
X = Create a new character block
D = Delete current character block
ENTER = Return to main menu
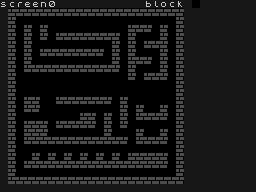
Screen Layout
Move cursor around the screen with cursor keys. Use 1 and 2 to select the character block you wish to place at the current cursor position. SPACE or 0 places the desired block on the current screen at this position. Alternatively, you may wish to use fast draw mode, by pressing F. This automatically places the selected block at the current cursor position every time you move the cursor. To exit fast draw mode and return to manual placing of blocks, press the F key again. You can copy a screen. Press M to mark the screen you wish to copy, then go to the screen you wish to copy over and press K to paste it in. ENTER returns to the main menu.
1 = Move left through block table
2 = Move right through block table
F = Toggle fast draw mode
M = Mark current screen
K = Paste from marked screen
N = Next screen
P = Previous screen
X = Create a new screen
D = Delete current screen
ENTER = Return to main menu
Sprite Images
Sprites are 16x16 pixel images which make up moving parts such as the player, player bullets, enemy craft, etc. Sprites may have any number of frames.
Move around the grid with the cursor, fixing and deleting pixels with SPACE or 0. Because AGD's collision detection is coordinate based, it is a good idea to fill out as much of the 16x16 area as you can, particularly for player and enemy sprites. Take a look at Monty Mole, Egghead or BLOB from Starquake as examples of sprites which fill a 16x16 area. Collectables don't matter as much, players seldom notice or care if they pick up a collectable from 3 pixels away.
The sprite editor also has a scratchpad screen. You can load SCREEN$ files from tape using the L key. You can then move a 16x16 pixel cursor around this screen, then press G to grab the image of the screen at that point and copy it to the clipboard. This can then be pasted in to a sprite frame with the K key.
Be warned, some emulators automatically load tape files as soon as you insert a tape, which will remove AGD from memory along with the game you were creating. Make sure you have disabled this option in your emulator first.
X = insert sprite
D = delete sprite
C = clear sprite grid
G = grab sprite from scratchpad screen and copy to clipboard
L = load scratchpad screen
M = copy sprite or tile to clipboard
K = copy sprite or tile from clipboard
H = flip sprite horizontally
V = flip sprite vertically
N = next sprite
P = previous sprite
I = insert frame
R = remove frame
F = next frame
Sprite Positions
This allows you to position sprites in their start positions for each level using the cursor keys. 8 sprite types are available, and sprites can be set up as any of these, allowing you to position bonuses, enemy sprites, the player sprite's starting position or any other type of sprite you have set up. Sprite images are separate from sprite types. Images are just the images you draw in the sprite editor, whereas a sprite's behaviour is defined by its type. Type 0 is usually used for the player's sprite (or sprites), although you could change this. You will need to allocate a type for each different moving item, such as aliens, bullets or collectables, and determine their movements using a simple scripting language. See the section on events for information about moving sprites.
N = next screen
P = previous screen
Q = move next sprite
I = change sprite image
T = change sprite type
D = delete current sprite from screen
X = add new sprite to screen
Objects
Distinct from sprites, objects are static items which a sprite might pick up, or possibly drop. Like sprites, they consist of 16x16 pixel images, although only have one frame. These can be edited in much the same way as sprite images.
For each object you will need to define its position at the beginning of the game. Unlike sprites, objects do not respawn every time the player enters a room, so they can be picked up in one room then dropped in another, making them ideal for arcade adventure games. The starting screen is changed with Q and W keys. A starting screen of 255 indicates that the object starts the game in the player's inventory. Objects which are missing at the start of play, ie don't appear on any screen or in the player's inventory, should be assigned a starting screen of 254. Press P to place an object in its designated position on its starting screen.
X = insert object
D = delete object
C = clear image grid
M = copy image or tile to clipboard
K = copy image or tile from clipboard
N = next object
L = last object
Q = change starting screen
W = change starting screen
P = position object on starting screen
Objects may be handled in the events code with GOT, GET, PUT and DETECTOBJ. Additionally, the OBJ variable stores the result of the last DETECTOBJ command, although you can use it for other things as well, if required. IF GOT n will be true if the player has object n in his inventory. GET n will put object n in the player's inventory (regardless of wherever the object currently is), PUT n will drop an object at the current sprite position, and DETECTOBJ will check to see if the current sprite is touching an object, placing the result in the OBJ variable. If no object is detected at the sprite position the value 255 will be returned.
For example, the following code will automatically pick up any object over which a sprite passes:
DETECTOBJ
IF OBJ <> 255
GET OBJ
ENDIF
Because GET and PUT make no check to see if the object is already in the player's inventory, they can be used to place objects on screen or remove them more or less at will. You may wish to have enemy sprites dropping bonuses, then remove them after a few seconds. Just because you remove an object from the screen doesn't mean you have to award the points or bonus that the player would have gained by collecting it himself.
Map Layout
AGD will allow sequential levels, but also has the ability to create explorer games where the player can explore a map.
The "map" of your game is arranged as a grid of 10 x 8 locations, all of which start off empty. Empty locations appear as two hyphens "--", rooms appear as the screen numbers, eg "01" or "12". As each room is designed in the screen designer it can be placed in this grid at a chosen location. To move around the map simply use SCREENUP, SCREENDOWN, SCREENLEFT, SCREENRIGHT commands. During the game it will not be possible for the player to move into an empty grid space. commands such as NEXTLEVEL or LET SCREEN=9 will not alter the current map position, so are best used in games with sequential levels, unless you are confident of what you are doing.
The red cursor can be moved around the grid using the cursor keys, to change the room at a particular grid location move use keys '1' and '2'. Rooms are displayed in the bottom two thirds of the screen as they are selected to make matters easier.
Your map will follow the rules of Euclidean geometry, but you can bend the rules to create a warped playfield should you desire. Moving left from a room situated at the left edge of the map will cause the player to re-appear in the room placed at the right edge of the next row up, if one is placed there. Similarly, moving right from a room at the right edge will take the player to the room at the extreme left edge of the room one row below. If you don't want this to happen you should construct walls on the relevant screens to form a physical barrier. It is also possible to re-use a room, that is to make it appear more than once in your map.
Moving from one screen to another will not alter the player sprite's coordinates, so these should be set manually at the same time as the SCREENLEFT, SCREENRIGHT etc. is performed. Any player sprites set up for a screen will only be used for the very first screen, or to spawn a new player sprite should he die on that screen. Should the player die on a screen where he has no default position he will not be respawned.
Press 'X' to declare a grid location as the point at which the player is to begin the game.
1 = Select previous room from list
2 = Select next room from list
X = Select room where player first starts the game
ENTER = Return to main menu
Jump Table
If your game makes use of gravity, you may want to edit the jump table. This allows you to edit the steepness of jumps and/or falls, allowing you to determine how high sprites can jump, or how quickly they descend when they fall through gaps in the floor.
The jump table is separated into a series of individual steps, and you can change the distance between these steps with the cursor keys. The red column represents the step you are currently editing. When you are happy with your jump table, press ENTER to return to the main menu.
Sound
H = Hear present sound
N = Next sound
P = Previous sound
X = Create new sound
D = Delete sound
Move around the values with the cursor keys, increasing and decreasing them with 1 and 2. Use 3 and 4 to increase and decrease tone in steps of 50. SPACE or 0 will toggle noise or tone off.
To play a sound in your game, use the SOUND command in the relevant event.
Sounds are played using the AY chip. For 48K beeper effects, use the BEEP command.
Save Game
Prompts for a filename for your game, then asks if you wish to preface the code block with a BASIC loader program which automatically loads and runs your game (and loading screen if you have set one up in the miscellaneous menu), should you wish to run it independently of the utility. The game is then saved to tape with or without the BASIC loader. If you save the game with a loader, it will loop back to the start when finished, otherwise it returns to BASIC so you can write your own end-of-game routines.
The saved code file can be loaded in later and edited. You may even wish to write your own BASIC loader. the simplest program to do this would be:
10 CLEAR 31231: LOAD ""CODE : RANDOMIZE USR 32000
You would save this BASIC program to tape with something like
SAVE "MyGame" LINE 10
Of course, you might want to set up a few other things first, such as the BORDER, PAPER and INK colours, plus a title page and maybe even a border around the status panel.
Load Game
Loads a new game from tape. If you are using an emulator, you will have to operate the tape browser yourself. Emulators with no tape browser, and those which automatically load inserted tapes are not recommended for AGD. AGD will only load code files which have been created with the utility.
Test Game
Allows you to test your creation. Press ENTER at any point to return to the editor.
Miscellaneous
Provides more options for modifying the game engine, and shows the address of the first available unused memory location, should you wish to tag your own routines to the end of the game.
Collision Distance
The collision distance is the sprite collision detection adjuster. Standard sprites are 16x16 pixels, so normally they will hit each other if their coordinates are less than 16 pixels apart. For a chunky sprite such as Monty Mole or Egghead, this is ideal. However, you may wish to draw a player sprite which is somewhat slimmer, leaving gaps around both sides. You won't want to count the gap as part of the sprite collision detection, so you can reduce this distance to a lower pixel count. Bear in mind that this setting only affects horizontal distances, and defines to all collision detection between sprites.
Sprite Height
While all sprites must be the same size, you now have a choice of either 16x16 or 16x24 for your game. However, be aware that 16X24 sprites take up 50% more memory. You will be prompted to confirm that you wish to alter the sprite size, and then AGD will convert the engine, memory permitting. Any existing sprites are converted to the new size. You should then edit them manually in the sprite editor.
SPRITEINK Mask
The SPRITEINK command normally allows you to change the INK colour of a sprite without affecting its BRIGHT or FLASH setting. If you want SPRITEINK to do this, or you are designing your game with ULAplus in mind, you will need to change this setting. A value of 7 changes the INK, 71 changes INK and BRIGHT, 135 changes INK and FLASH and 199 changes INK, BRIGHT and FLASH. For ULAplus, a value of 199 allows you to select any of the 4 colour look-up tables. To turn on BRIGHT, add 64 to the SPRITEINK value in the same way you would with the BASIC ATTR function. To turn on FLASH, add 128.
Loading Screen
This feature is to enable you to import a loading screen created with another utility. AGD first prompts you to confirm that you wish to load a loading screen, and then loads a screen.
Order Sprites
When order sprites is switched on, the sprite table is sorted and the order in which sprites are drawn depends on their vertical position in order to eliminate flicker. When this is turned off the order the sprites are drawn does not vary from one frame to the next.
Specialise
This option selects which of the three specialist adaptations you wish to use for your game. The adaptations available are particles, effects and puzzle. The particle engine enables TRAIL, EXPLODE and LASER commands. It is great for vapour trails/magic dust, explosions, lasers and generally there to give your shoot-em-ups a bit more polish. Effects gives FADE, TELE and TICKER commands to fade the window, type messages onto the screen in the style of a typewriter and pixel scroll a message at a specified point on the screen – handy for scrolling messages in your intro or in-game text message updates. Puzzle enables the INV command allowing the player to select items in his or her inventory. It also remembers any blocks which are positioned on a screen using the PUTBLOCK command and redraws them when the player leaves and then re-enters a screen.
AY Sounds
This option can be used to disable AY sound effects, should you wish to set up an interrupt-driven AY music routine instead.
Messages
This is where you can define the text messages your game will use. Press ENTER at any point to return to the main menu.
N = Next message
P = Previous message
SPACE or 0 = Edit current message
X = Create new message
D = Delete message
Events
This is the part where you get to have a say about the game logic, and can change the way it works in a variety of different ways. While the editor and compiler are not going to rival a proper language like BASIC, AGD does provide a limited number of statements, functions and variables which should enable a variety of different arcade games or arcade adventures to be created. Think of it as an arcade version of Incentive Software's GAC - you may need to be inventive about how you implement the features you want, but then that is half the fun.
There are several events for which you can write the logic. Aside from those which occur at certain times in the game, there are events associated with 8 sprite types. These are the events which control the movement and logic of each type of sprite. Sprite type 0 is usually reserved for the player's sprite, so this code should test for keys and move the sprite around accordingly. The rest are all yours to do with as you wish. For example, you could choose to make sprite types 1 and 2 different alien nasties with different movement patterns, and perhaps use sprite type 3 for bonus sprites which the player picks up.
| Player (type 0) control | - player movement, reading keys, collision detection |
| Sprite type 1 | - behaviour of sprites with type 1 |
| Sprite type 2 | - behaviour of sprites with type 2 |
| Sprite type 3 | - behaviour of sprites with type 3 |
| Sprite type 4 | - behaviour of sprites with type 4 |
| Sprite type 5 | - behaviour of sprites with type 5 |
| Sprite type 6 | - behaviour of sprites with type 6 |
| Sprite type 7 | - behaviour of sprites with type 7 |
| Sprite type 8 | - behaviour of sprites with type 8 |
| Initialise sprite | - whenever a sprite is initialised |
| Main loop 1 | - every game loop |
| Main loop 2 | - every game loop |
| Intro/menu | - before the game begins |
| Game initialisation | - at start of game, set up variables |
| Restart screen | - what happens when player restarts a screen |
| Fell too far | - when any sprite reaches the end of the jump table |
| Kill player | - happens when player loses a life with a KILL command |
| Lost game | - when the player loses his last life |
| Completed game | - when game completed successfully, eg congratulations |
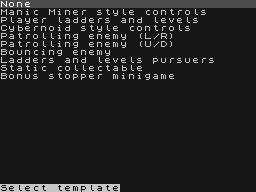
To modify the events, use cursor up/down to select the event, then press space or 0. If no code has been written for that event, you will be presented with a further menu of basic code templates to start you off. You don't have to use a template, these are just pre-written examples of code to perform different functions. When you select a template, the editor copies a chunk of code into the event for you, but you don't have to select one.
The options are:
None
Manic Miner style controls
Player ladders and levels
Cybernoid style controls
Patrolling enemy (L/R)
Patrolling enemy (U/D)
Bouncing enemy
Ladders and level pursuers
Static collectable
Pushable Block
Bonus stopper minigame
The first option skips the templates and just lets you start with a blank piece of paper.
The next few options are player controls. Manic Miner style controls gives you left, right and jump keys. Player ladders and levels use left, right and up and down ladders. Cybernoid style controls are left, right, fire (particle engine only) and up. When not ascending, the player sprite will move down automatically, as in Cybernoid.
There are enemy sprite templates too. The Patrolling enemy (L/R) option will move left and right along a platform, reversing when it hits a wall or there is a gap in the floor. Patrolling enemy (U/D) moves up and down, reversing whenever it hits a wall. Bouncing enemies just bounce diagonally around the screen until they hit something, then change direction. Ladders and levels pursuers walk along platforms and walls, going up and down ladders.
Static collectables are sprites that sit on screen and wait for a collision with the player, whereupon they remove themselves and add to the player's score.
Pushable blocks will react to collisions with the player sprite by moving out of the way. They also test for collisions with other sprites of type 1 and destroy any they encounter – you may wish to modify this behaviour. Moving platforms stop player sprites falling in just the same way a standard platform would. The template moves them up and down but with a little modification they could be made to move left and right instead.
Once a template is selected, or you have selected an event which already has some code, you can edit the code for that particular event. Symbol shift and A returns to the event selection screen. The editor will quickly run over your code, and report back if it does not understand any of it, positioning the cursor on the line it does not understand. Code is then compiled directly to lightning-fast machine code.
Code editor keys:
| SYM-Y | Cut line |
| SYM-U | Paste line |
| SYM-Q | Home |
| SYM-E | End |
| CAPS-2 | Toggle caps lock |
| CAPS-3 | Delete forward |
| CAPS-4 | Insert/overtype |
| SYM-CAPS | Toggle extended mode |
Functions can only be used after an IF.
IF
Test. If the following condition is true the code up to the next ENDIF statement is executed. IF can be used with a function, or to test variables or sprite parameters against each other, or against specific numeric values.
ENDIF
Marks the end of the conditional code.
LET
As in BASIC, this allows you to assign a value to a variable or sprite parameter. The value assigned can be a number, or another variable or sprite parameter.
KEY
Function. Expects a single numeric argument and condition is true if the key is pressed.
CANGOUP, CANGODOWN, CANGOLEFT, CANGORIGHT
Functions. Condition is true if the current sprite can move up/down/left/right.
LADDERABOVE, LADDERBELOW
Functions. Condition is true if the current sprite can go up/down a ladder.
X, Y
Sprite parameters. These are the coordinates of the current sprite.
A, B, C, D, E, F, G, H, I, J, K, L, M, N, O, P, Q, R, S & T
Global variables. These hold 8-bit values, so values of 0-255 are possible.
SCREEN, LIVES
Global variables. These contain the current screen number and the lives remaining.
TYPE
Sprite parameter. This is the type of sprite being processed. Best used in conjunction with the IMAGE parameter, setting this parameter will completely change the sprite's behaviour - handy for turning a nasty into a bonus, or making a sprite stop and explode before killing it. There is no reason why you couldn't change a sprite to type zero and put it under the player's control, or change the player's sprite type to something else with a slightly different set of controls. So long as the new sprite type has appropriate code set up in the relevant event, there's no limit to what you could do. If you haven't set up any code for the sprite type your sprite will just sit there - which may be okay if that's what you want.
IMAGE, FRAME
Sprite parameters. These are the sprite and frame numbers shown in the sprite editor. You can change the sprite according to whichever direction the player is facing, or perhaps you might want to give the player a choice of vehicles to control. Setting a frame number beyond the limit of the sprite will result in a different sprite image being displayed, so use FRAME with caution. When setting the image, it is a good idea to set the frame to 0 at the same time, unless you have a very good reason for not doing so.
DIRECTION, PARAMA, PARAMB
Sprite parameters. You can use these as you see fit, perhaps to indicate the direction in which a particular sprite is moving, or the particular phase it is going through. Invaluable for any form of enemy AI.
ANIMATE
Command. Animates the present sprite, automatically cycling through the frames in ascending order.
ANIMBACK
Command. As ANIMATE, but cycles through frames in descending order.
NEXTLEVEL, RESTART
Commands. Move to next level, and restart current level respectively.
SPRITEUP, SPRITEDOWN, SPRITELEFT, SPRITERIGHT
Commands. Move the current sprite accordingly. No check is made for blocks in the way, or out-of-screen conditions, so you will have to do that yourself with functions such as CANGOLEFT or LADDERABOVE.
SPAWN
Command. Expects 2 parameters for sprite type and image. This spawns a new sprite with the specified type and image at the current sprites's position. The new sprite is created with FRAME, DIRECTION, PARAMA and PARAMB all set to zero. The current sprite is unaffected.
SPAWNED
Command. Should only be used after a SPAWN instruction. This command selects the newly spawned sprite. Any code written after SPAWNED will refer to the new sprite. Use ORIGINAL to switch back to the original primary sprite. Alternatively, you may prefer to place your code in the Sprite Initialisation event, it's up to you.
REMOVE
Command. Removes the present sprite from the table. Useful for destroying enemies or picking up objects.
PUTBLOCK
Command. Requires a parameter to specify the block number. This places the specified block at the current LINE and COLUMN position on the screen, and can be useful for opening and closing doors. Note that exiting and re-entering the screen or redrawing after MENU or INV will restore the screen to its default position, unless you have selected the puzzle specialisation.
COLLISION
Function. Requires one numeric argument to specify the sprite type. Condition is true if the current sprite is in collision with another sprite of the type specified.
OTHER
Command. Should only be used after a successful COLLISION check. This command selects the other sprite, ie the secondary one with which the original sprite has just collided. Any code written after OTHER will refer to the secondary sprite. Use ORIGINAL to switch back to the original primary sprite when you have finished the code for the secondary sprite.
ORIGINAL
Command. Used after OTHER and SPAWNED commands, this reverts to the original sprite.
ENDGAME
Command. Ends the game in victory. This performs the Completed Game event. Completing the last screen in a game with sequential levels will do the same. The only other way in which a game can finish is if the player loses all his lives, but that does not perform the Completed Game event.
SHOWSCORE
Command. Shows the score at the current cursor position. Should be immediately preceded by instructions setting up the line and column position for the cursor.
SCORE
Command. Expects to be followed by a number to add to the score. SCORE 100 will add 100 points to the player's total. Values 0 to 255 are valid.
SOUND
Command. Starts a sound effect with the AY sound chip. Expects a single parameter for the sound number to play.
BEEP
Command. Starts a beeper sound effect which starts low and increases in pitch. Expects a single parameter for the sound duration. Values above 127 produce white noise effects.
CLS
Command. Clears the screen.
BORDER
Command. Expects an argument from 0 to 7 inclusive. Sets the border colour.
COLOUR
Command. Expects an argument. Sets the permanent display attributes. Format is 128 * FLASH + 64 * BRIGHT + 8 * PAPER + INK. Can be used prior to displaying text or clearing the screen.
DELAY
Command. Expects an argument. Pauses for the duration specified.
MESSAGE
Command. Expects an argument for the number of the message to display.
KILL
Command. Initiates the kill player event and decrements the life counter. You should set up the lives counter in the initialisation event using something like LET LIVES = 3.
LINE, COLUMN
Variables. These determine the position at which the score or message will be displayed. They are temporary and change every time a sprite is displayed, so always use them immediately before a MESSAGE or SHOWSCORE command.
GETRANDOM
Function. Generates a random number between zero and the argument, and places it in the RND variable. GETRANDOM 100 will generate a number from 0 to 99, GETRANDOM 2 will generate a zero or 1.
RND
Variable. The last random number generated by GETRANDOM.
ADD, SUBTRACT
Commands. Add or subtract to or from a sprite parameter or variable, eg. ADD 1 TO A or SUBTRACT 5 FROM B.
DISPLAY
Command. Displays the numeric value in the variable or parameter that follows. For example, DISPLAY LIVES.
SCREENUP, SCREENDOWN, SCREENRIGHT, SCREENLEFT
Commands. Move up, down, left or right one screen if possible.
DEADLY
Function. Condition is true if the current sprite is in contact with a deadly block.
CUSTOM
Function. Similar to DEADLY, true if the current sprite is in contact with a CUSTOM block.
WAITKEY
Command. Waits for a keypress.
JUMP
Command. The current sprite will jump, provided it is not already in mid-air and there are no walls in the way. As you would expect, any sprite can be made to jump, not just those under the direct control of the player.
FALL
Command. Provided the sprite is not already falling or jumping, this checks to see if the sprite is standing on top of solid ground. If not, it will start to fall, using the descending half of the jump table (your game will automatically find this point, even if you have modified the jump table). FALL is useful if a sprite type is subject to gravity, eg platform games.
GOT
Function. Used in IF statements and expects a single argument. The expression is true if the specified object is owned by the player. The argument can be a variable if required, so IF GOT 1 is valid, as is IF GOT A. You could even use a sprite parameter as an argument if you wish.
GET
Command. Expects a parameter specifying the object to get. Places the specified object in the player's inventory, regardless of where it is. The object could be on the current screen, another screen, or just missing. It is up to you to decide when the player can get a particular object. You may want to use DETECTOBJECT to determine when a sprite is touching an object first.
PUT
Command. Requires an argument specifying the object number. The object is dropped onto the screen at the current sprite's position, unless it is already on the current screen. Argument can be numeric, a variable or sprite parameter.
DETECTOBJ
Command. Detects objects touched by the current sprite, and places the result in the OBJ variable. If the sprite is touching more than one object, only the object with the lowest number is detected. If no object is detected, OBJ will be set to 255.
OBJ
Variable. The last object number detected by DETECTOBJ.
CLOCK
Read-only variable. The current frame counter, in 50ths of a second. Useful for timings.
MENU
Command. Requires an argument specifying the message number. Produces a pop-up menu in the middle of the play area, where the options are taken from the specified message number, each on its own line. The player then selects an option using up, down and fire controls. Usually this would happen when the player presses a certain key. However, it could pop up in another sprite event, eg when a certain sprite collides with the player. You could display a message – the sprite's conversation with the player – then use MENU to prompt for a reply. The screen is redrawn after MENU.
INV
Command. Requires an argument specifying the message number. Similar to MENU, but this produces a menu based on objects in the player's possession. Set up a list of the object names used in your game in a message with each item on a separate line, and use INV n, where n is the message number containing the object names. INV will present the player with a menu containing only those items currently in the player's inventory. Useful for selecting an item to process or drop. INV only works with the puzzle specialisation.
EXIT
Command. All processing of the current event is terminated.
REPEAT
Command. Requires a parameter to determine the number of repeats. The code up to the next ENDREPEAT will be repeated the given number of times. REPEAT cannot be nested.
ENDREPEAT
Command. This marks the end of the block of code to be repeated. Code placed in a REPEAT..ENDREPEAT loop is automatically indented by the editor to improve readability.
MULTIPLY
Command. Multiply a sprite parameter or variable, eg. MULTIPLY C BY 7.
DIVIDE
Command. Divide a sprite parameter or variable, eg. DIVIDE Y BY 8.
SPRITEINK
Command. Sets the ink colour for the current sprite to the specified colour, eg SPRITEINK 4 or SPRITEINK PARAMB. Does not affect PAPER, FLASH or BRIGHT. To avoid leaving a trail of differently-coloured INK, reset the SPRITEINK at the start of each sprite event. If your background INK is normally 7 (white), you may wish to use SPRITEINK 7 at the beginning of the sprite event, move the sprite as normal, then set it to the colour you want. Static collectable sprites should only reset the SPRITEINK to the normal background INK when they are collected. See the demonstration game Diamond Geezer for an example.
LASER
Command. Expects a numeric argument. Fires a laser left or right from the current sprite position, depending upon the parameter. Even parameters fire left, odd ones fire right. Sprite collisions with lasers can be detected in the sprite type events using IF COLLISION 10. LASER Only works if the particle specialisation is selected in the miscellaneous menu.
TRAIL
Command. Useful for fairy dust or vapour trails, TRAIL creates a vapour trail particle at the centre of the current current sprite. By using ADD 8 TO Y or SUBTRACT 8 FROM Y first, you could create a trail to the left or right of the sprite. Remember to ADD or SUBTRACT 8 again after the TRAIL command to restore the sprite's original coordinates. Only works with the particle specialisation.
EXPLODE
Command. Requires a numeric argument to specify the number of particles. Creates an explosion at the current sprite position. Used with REMOVE, EXPLODE removes the need for you to draw an explosion animation for your sprites. If you forget to follow EXPLODE with a parameter, the next command will not be compiled properly. If that command is REMOVE your sprite won't be removed and you'll wonder why it explodes but remains in play. Particle specialisation only.
FADE
Command. Fades the window to black. Fade only works with the effects specialisation enabled.
TICKER
Command. Pixel scrolls a text message at the current LINE and COLUMN position. Expects 2 arguments, the first is the message number and the second the width of the message in characters. TICKER continues and repeats the message when it reaches the end. TICKER 1 16 will scroll message 1 in a strip half the width of the screen. To turn TICKER off, specify a message number which does not exist, eg TICKER 99 1. Only works if the effects specialisation is turned on.
BIGMESSAGE
Command. Requires a parameter specifying a text message. Displays the message on screen in double-height text. Effects initialisation only.
REDRAW
Command. Redraws the screen, sprites, objects and any particles. If you are writing an arcade adventure, you may wish to display messages in the play window, pause for a key with WAITKEY and then REDRAW before returning to the action.
SILENCE
Command. Silences the AY sound chip.
CONTROLMENU
Command. Useful for the menu/intro event, CONTROLMENU waits for the player to select a control option. Options are 1 for keyboard, 2 for Kempston joystick and 3 for Sinclair joystick (keys 67890).
DIG
Command. Expects a parameter 0 to 3 specifying the direction up, down left or right respectively. Removes FODDER blocks immediately adjacent to the player sprite. Only available with the puzzle specialisation.
STAR
Command. Part of the particle engine, STAR creates a vertical or horizontal starfield when called repeatedly. Expects a parameter to specify the direction, 0 for vertical and 1 for horizontal.
BIGSCORE
Command. As SHOWSCORE, but displays the message on screen in double-height text. Effects initialisation only.
STOPFALL
Command. Stops a jumping or falling sprite in mid-air and invokes the fell too far event if applicable.
Example 1
Assume we have a play window 22 characters high with a single character gap at the top and bottom of the screen. Say we want to draw a box around the window. We can do this by displaying messages in the Game initialisation event. We could set up message 0 as the top line to display above the window, with message 1 as the bottom line. To draw the lines down the sides we could set them up in message 2, and then use a REPEAT loop to draw them. Something like this might do the trick for us:
LET LINE = 0
MESSAGE 0
REPEAT 22
MESSAGE 2
ENDREPEAT
Example 2
If we select sprite type 3, and choose Static collectable as our template, we will be presented with the following lines of code:
IF COLLISION 0
REMOVE
SCORE 100
ENDIF
We can add a short beeper sound effect by inserting the command BEEP 30:
IF COLLISION 0
BEEP 30
REMOVE
SCORE 100
ENDIF
Going further, we can insert the following lines at the start we can change the sprite's behaviour:
IF CANGOUP
SPRITEUP
ELSE
REMOVE
ENDIF
So our event now looks like this:
IF CANGOUP
SPRITEUP
ELSE
REMOVE
ENDIF
IF COLLISION 0
BEEP 30
REMOVE
SCORE 100
ENDIF
We now have a collectable sprite which moves up until it hits something, and then disappears, like a bubble. Now we need some code to spawn our new sprites at the bottom of the screen. We can do this in the main loop, so select the Main loop 1 event, and insert these lines:
GETRANDOM 127
IF RND <= 6
SPAWN 3 0
SPAWNED
IF TYPE = 3
LET X = 168
GETRANDOM 160
LET Y = RND
ADD 8 TO Y
ENDIF
ORIGINAL
ENDIF
This code first generates a random number from 0 to 127, and if that number is less than or equal to 6, it generates a sprite of type 3 (the previous event we edited) and a sprite image of 0. If the sprite has spawned properly, it then sets the x position to the bottom of the play area (assuming the play area ends 8 pixels from the bottom of the screen), and chooses a random y position between 8 and 168.
Example 3
Assume we are writing a top-down maze game in the Atic Atac style and wish to include patrolling enemies. We can select sprite type 4 and choose the Patrolling enemy (L/R) template. However, this template assumes we are writing a platform game so we will need to remove the lines which check for gaps as the sprite will not be on a platform. In the template, this check is done by adding or subtracting 16 (the sprite width) to the sprite's horizontal (Y) coordinate and testing to see if the sprite can go down. If it can, the sprite changes direction because there must be a gap. In our case, we simply want to move left or right until we hit something, then turn around so it is a question of deleting the unnecessary lines. Our template should look like this:
IF PARAMA = 0
IF CANGOLEFT
SPRITELEFT
ELSE
LET PARAMA = 1
ENDIF
ELSE
IF CANGORIGHT
SPRITERIGHT
ELSE
LET PARAMA = 0
ENDIF
ENDIF
Character Set
AGD comes with its own font editor. Characters are edited using the cursor keys with 0 or SPACE to set/unset a pixel. The entire printable range of 96 characters are displayed at the bottom of the screen, and you can step through these with the N and P keys.
If you prefer, you can load a standard Spectrum font created with another utility into AGD. First make sure that if you are using an emulator, it does not automatically load tapes or you will lose the game you are working on. Press L to load a font.
P = Previous character
N = Next character
L = Load font from tape
ENTER = Return to main menu
Technical information
Games created with the utility are stand-alone, and should work independently of the editor itself. AGD does not change the interrupt mode, so you are free to set up your own interrupts, to play music, for example. However, you should not disable the interrupts. If you wish to set up your own interrupts using IM2, make sure your service routine increments the byte at memory location 23672 every frame, or your game will hang. AGD does not change the value of the IY register, although IX is used throughout, mostly as a sprite pointer.
Games occupy memory from around 31200 upwards, and this is the area which is saved by the utility. The exact start address varies as non-critical events grow down from 31232 to make room in upper RAM for the game. Below this, the code for the editor is located, being swapped in as required from other RAM banks. At the very top of RAM, the last 768 bytes from 64768 to 65535 are used as a dummy collision map area to distinguish between different types of blocks - walls, ladders, empty space and so on. At the end of the game is an area of 300 bytes used for the particle engine should you decide to employ lasers, vapour trails or explosions. This buffer does not exist in the puzzle or effects engines. No buffer is required for screen data decompression, since these are expanded on-the-fly by the routine which draws the screen.
When saving your creations, opting to save a BASIC loader will automatically create an auto-loading version of your game, complete with a loading screen if you set one up in the miscellaneous menu. Auto-running games do not return to BASIC, looping continuously. You will therefore need to program your own intro screen in AGD. If you opt not to create a BASIC loader, your game will return to BASIC at the end.
Games can be controlled via keyboard or Kempston joystick, and this is done via the byte at address 32005. A value of 1 means Kempston controls are used for the first five keys, 2 uses the Sinclair joystick keys 6, 7, 8, 9 and zero. Any other value defaults to keyboard controls.
AGD sets the keyboard repeat rate system variable at address 23562. The Sinclair ROM sets this to 5 on startup, and AGD will lower this to 3 to speed up editing. However, if you POKE 23562 with any value other than 5 AGD will not change it. So you can POKE 23562,1 to set the keyboard repeat rate to maximum speed, should you wish to do so.
Adding Music or Third Party Subroutines (particle/effects only)
Should you wish to add your own routines to the game, you should add these three lines temporarily to the event where you wish to call the external routine:
ASM 205
ASM 85
ASM 5
Don't worry too much about how this works, it is simply a dummy call to a point in the Sinclair ROM which does nothing. We will change this later.
Next, select miscellaneous from the menu and note the address displayed at the bottom of the screen. This is your compilation address, the memory location at which you should compile your external routine. Then, using a calculator you need to work out two values to put into the event(s) where you previously added the ASM values. You need to work out your compilation address divided by 256, and also the remainder.
Go back to the event(s) where you put the ASM values, then replace 5 with the compilation address divided by 256, and 85 with the remainder THEN IMMEDIATELY SAVE YOUR GAME WITHOUT THE BASIC LOADER OPTION. Do not test it at this point as AGD will crash because your routine is not in memory. You will need to make sure your BASIC loader loads your own routine in addition to your game.
Kempston Mouse
Few Spectrum games make use of mouse control, and AGD has not been designed specifically to work with such a device. However, AGD does have a hidden routine to read the Kempston mouse. To use it, select the adventure specialisation from the miscellaneous menu, then put these three commands into one of your main loop events:
ASM 205
ASM 160
ASM 129
This will place the mouse coordinates and fire button statuses into variables A, B and C.
Further Information
Paul Jenkinson has produced a series of excellent AGD video tutorials, which can be found on his website:
http://www.randomkak.blogspot.co.uk/p/agd-video-tutorials.html
The official AGD forum is the place to find news of the latest releases, tips on getting the best out of the utility, and details of games which have already been written with AGD or are currently under development. You can find the forum here:
http://arcadegamedesigner.proboards.com/
<// Manual reproduced here with kind permission>
|